- Unit 1
- Unit 2
- Unit 3 Job Roles
- Unit 4 – Live Sound
- Unit 5
- Unit 6
- Unit 7 – Remixing
- Unit 8 – Proposal
- Unit 8 – Research
- Unit 8 – Planning/Context
- Unit 8 – Practice Skills
- Unit 8 – Evaluation
Week 1 – The first recording session was conducted in studio 2, due to this we had a lack of equipment such as: microphones & microphone stands. As we have had little to none experience within studio 2 we struggled to create a headphone mix for the session, amongst these problems a member of the band turned up half way through the session, giving us less time to record the track, because of these issues we managed only drum tracks.
Week 2 – The second recording session was conducted in studio 1, as my group was familiar with the set up in studio 1, the session was easier to set up for. We managed to record three guitar tracks for ‘pray for the day’ & we managed to record all the drums for ‘council of the gods’. I feel like improvement upon week one was due to being a more comfortable environment as we have used this facility before.
Week 3 – The third recording session was conducted in studio 1, complications began to arise immediately as the main guitarist was sick on this day, the drummer could not carry on recording the drum track without the guitarist present as this is how they normally record tracks. As a result of this we decided to spend the rest of the session mixing and mastering the recordings from week one.
Week 4 – The forth recording session was conducted in studio 2, we managed to record all vocals takes completed for ‘pray for the day’ & all drum tracks recorded for ‘council of the gods’ I feel like this has been a massive improvement upon last week as there was a lot of frustration from myself and my group for the lack of band members turning up int the previous week.
Week 5 – The fifth recording session was conducted in studio 2, as we had completed all drum and guitar recordings sessions, all that was left was to record the final vocal takes and add ‘adlibs’ to the track to create the bands overall sound, by end of this session all recordings were completed for both ‘pray for the day’ & ‘Council of the gods’
General Comments – Throughout all recording sessions the bassist in the band failed to turn up to every single session making all the recording sessions more difficult as we had no choice, but to cut the bass from the track, this then creates a disruption in the sonic balance of the track, as the kick is the only leading bass presence throughout, making the rhythmic session of the track sparse.
Adding to the comments above two out of the three guitarists didn’t turn up to any sessions, forcing the solo guitarist to improvise to recreate the other guitar takes, using ‘in the box’ plugins in order to recreate variation within the track
Overall – Overall the completion of the two tracks was a difficult and long winded process, this is down to multiple complication from both engineers & band members, there was issues with routing processes in studio two which wasted a lot of session time, however using the combined knowledge of the group we troubleshooted and managed to resolve all technical issues.
Band members not turning up to sessions wasted further time and contributed to complications in the project, these issues include: lack of bass guitar recordings in both tracks and repetitive guitar takes as one of the three guitarists showed up to any of the sessions, I feel like myself as individual have put a lot of time & effort into this project to produce two tracks I am presenting. I understand that assignment brief requires three tracks, but due to the amount of time wasted; especially on the bands side we have regretfully only been able to produce two tracks.
If I were given the task a second time round, I would wish for a more positive mind set from the band given, this in turn would make the band more dedicated to session time slots and overall the project would of achieved a more positive outcome from both engineers & band. As my first larger scale recording project I feel like there have been more negative moments than positive, this has had a major effect on myself and individuals in group which I believe has affected their performance in a negative manor.
The drummer from the band has been exceptionally professional as has turned up to every session without fail myself and my group could not have been more pleased about this, this has made the process in making the tracks easier, but overall the project has been a very difficult and eye opening experience of how communication in the recording environment can make such a massive difference to the outcome, this task has taught me that it is important to communicate with your band, as there is a certain level of respect required from both band & engineer to achieve a well recorded track.
As an individual I feel like in future projects I should move away from the mixing desk in order to expand my knowledge of microphone placement & techniques to improve my knowledge of the setting up of a session, which would lead to less time wasting in further projects. My communication skills with artists of bands in future could improve, as I need to come out of my comfort zone in this area and speak to members of the band and artists so that they know what I require from every member of the band to make the most out every session.
I made 2 tracks for the band Screaming Walls which where roughly around 3-5 minutes each, I feel like with the techniques and skills that I have learnt I can really make the 2 tracks sound much better
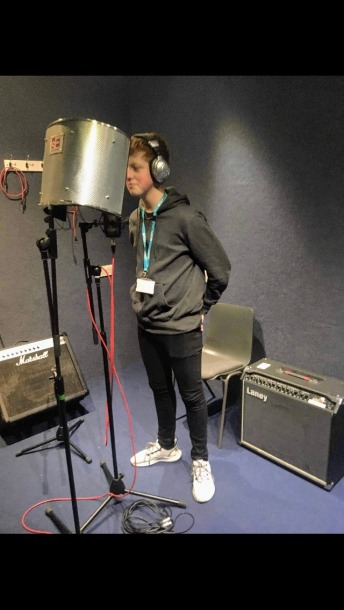
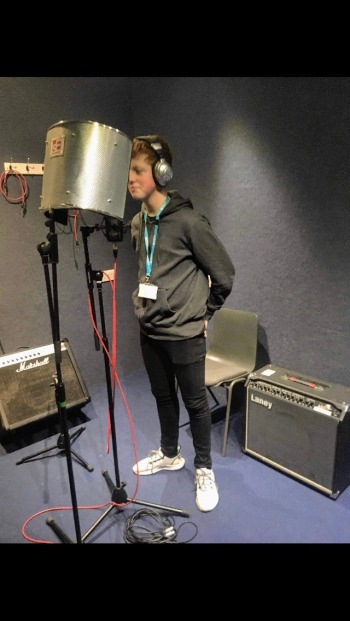
As you can see in the video I am recording Screaming walls before recording them I added the Amp plugin I don’t this because of the guitarist asking for a distorted sound.
For my amp choices I used a Laney because that was the preferred choice by the guitarist I used a microphone at the back of the amp and at the front so that it boosted the volume and made the guitars hit harder, I Used 2 SM57s because they are an industry standard microphone that are specifically tailored to pick up the mid range much better then most microphones and can take the intensity of amplifier.
The mics we used throughout the session were:
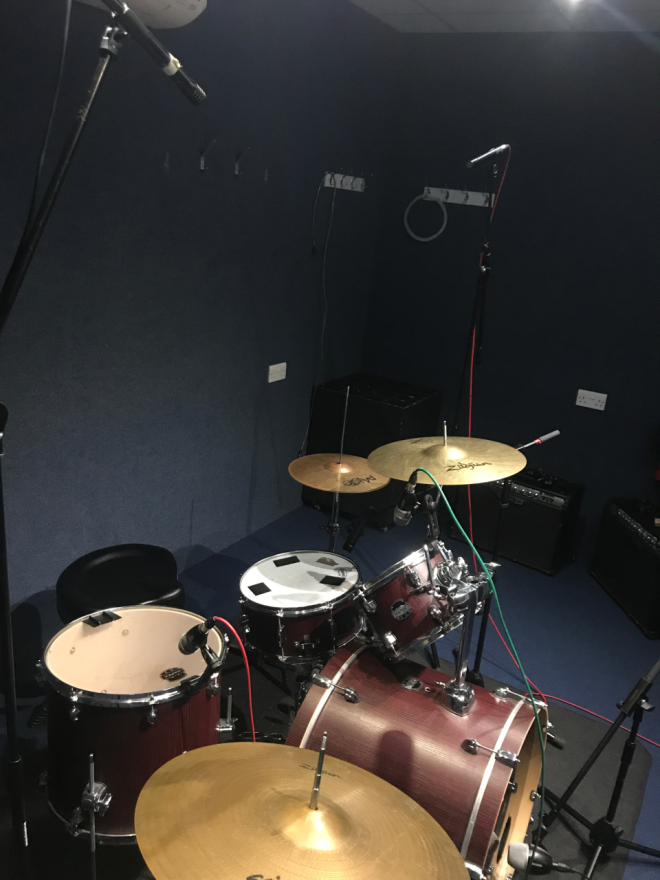
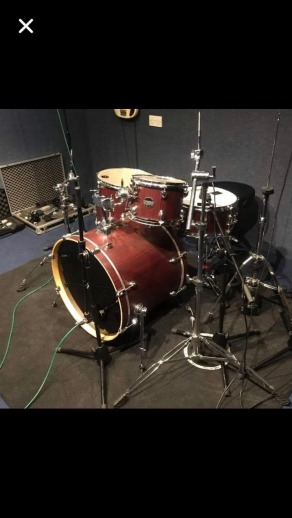
As you can see that this is my set up of drum kit I decided to use the X and Y technique to assure that my hats would be heard a lot better in the mix as heavy metal use a lot of hats in there songs
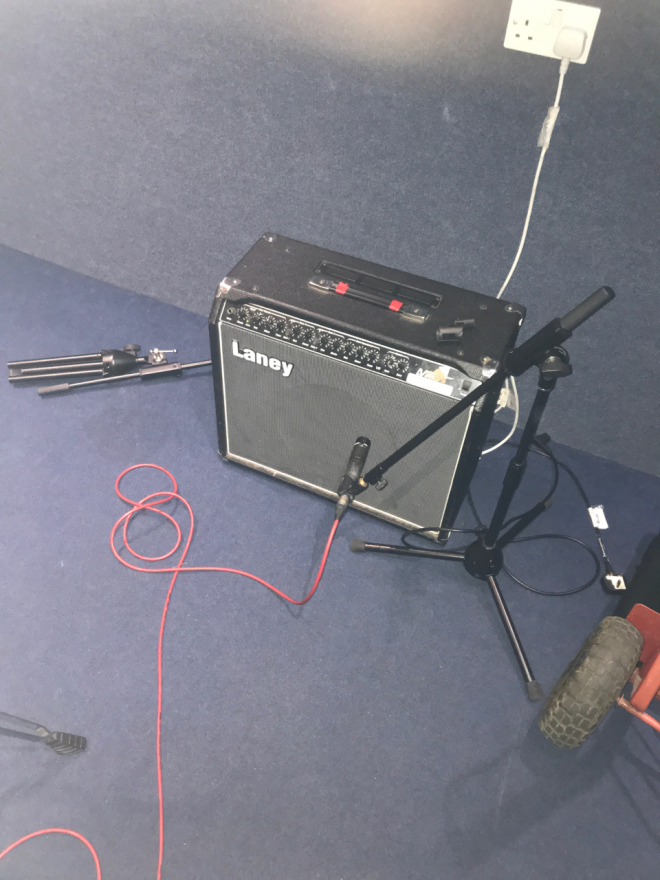
Here is the guitar amp mic I decided to use the SM57 the reason why is because of how much more effective it is for picking up the midrange sound but not only did I choose this I decided to choose the laney amp because the laney having an overdrive function which makes the guitars sound more heavy.
In the band there was supposed to be a Bassist but they never actually turned up to our recording sessions but in our recording group we worked with what we were given and it was successful anyway
There was some sort of worry when using the RODE NT1-A due to how fragile it is but as I set it up correctly there was no issues.


As you can see this is me using a technique called doubling drum tracks its where it creates a Midi and it makes your drums much more effective in the mix it made the drums in the track much more enjoyable and it really brings the drums together.
Here are the two tracks that I create here they are before being mixed and mastered
As you can you hear the tracks sound awful due to not being mixed and mastered yet the track pray for the day its self you can hear the vocals dominate the mix and you cannot really hear the drums and guitars at all due to this.
Above you can see my unmixed and mastered track the drums can not really be heard and the vocals just sound like that he’s shouting into the mic rather than screaming and the vocals just completely dominate the track making that the only thing that can be really heard.
As you can hear above this is the un mixed version of the song belly ache as you can hear the drums can’t really be heard and the vocals drown the mix but the guitars and vocals fit nicely and as you can see the Soundcloud wave it isn’t really clean where as in comparison to the mixed track you can see that the wave formation is a lot more together.
As you can hear in the above track it sounds absolutely great the the drums are perfectly in the mix while the guitars are along the the drums sound perfect as they have the heavy metal guitar sound, also the vocals sound much better compared to the un mixed version of pray for the day.Also you can see the Soundcloud waves and if you compare them you can see that the mixed version is so much fuller and the level of the waves aren’t al over the place and also the arrangement looks different.
As you can hear in the track above that the intro sounds so much better and it comes in so much smoother than the unmixed track above also the guitars and drums connect together nicely by forming a outstanding sound not only this but the vocals sound perfect in the mix creating a punchier sound.
Above you can hear the mixed and mastered version of the track belly ache the guitars and the drums sound great together in the mix and the vocals are placed on top just perfectly and I added a slight reverb to vocals to make it sound great in the mix.
Create an original composition
As you can hear in the track above that it is un mixed I think the track sounds great I really enjoy how the hi hats bring in suspension to build up a drop also I enjoy the triangle sound in the mix as you can see in the Sound cloud waves that the track clearly needs mixing and mixing due to the gaps inside of the track.
As you can see and hear this is the mixed and mastered finished track of my final unit 8 project as you can see the sound waves are so much more together than the other unmixed version and as you can also hear that the drums are much more punchy and the 808s hit a lot harder and the chords sound so much better together.
Also you can see that I have uploaded on to my Soundcloud profile “HC Beats”
In this part of the Blog I am going to be taking about planning and how much I progressed during the 12 weeks when recording Screaming walls.
| Week | Date | Activity | Resources/what equipment I need |
| 1 | 18/03/19 | Researching Heavy Metal techniques for Mixing and mastering
|
Personal computer needed can be done at home |
| 2 | 25/03/19 | Recording drums for 1st recording track using studio 1 | Studio needed for sound desk, do not have access to studio at home studio 1 gives best sound quality |
| 3 | 23/04/19 | Researching Techniques for Heavy Rock Vocals | Personal computer needed can be done at home |
| 4 | 29/04/19 | Recording band guitars and bass | Studio needed for di boxes and amps to record bands guitar and bass, don’t have access to these at home |
| 5 | 06/05/19 | mixing tracks that have been made | Personal computer needed to mix the tracks that are completed |
| 6 | 13/05/19 | Developing writing proposal | Personal computer needed to write up the proposal |
| 7 | 20/05/19 | Recording vocals for tracks | Studio needed don’t have access to microphones at home |
| 8 | 27/05/19 | Mixing | Personal computer needed to mix using Logic ProX software on personal computer |
| 9 | 03/06/19 | Mixing | Personal computer needed to mix using Logic ProX software on personal computer |
| 10 | 10/06/19 | Mixing | Personal computer needed to mix using Logic ProX software on personal computer |
| 11 | 17/06/19 | Mastering | Personal computer needed to master using Logic ProX software on personal computer |
| 12 | 21/06/19 | Mastering | Personal computer needed to master using Logic ProX software on personal computer |
Above shows my plan, but overtime many things happened and many mistakes made me change my plans multiple times
Week1- As I wasn’t in the studio til next week I felt that proposal would be best to start to research into different types of techniques for mixing and mastering heavy metal songs as I haven’t really been recording with these types of genres before and as I am not good at mixing and mastering I felt that this would be the best thing to do for preparation for when I am going to be recording the band next week.
Week 2- Then me and my Partner Michael started to record Screaming Walls first track “Pray for the Day” We first encountered many problems during being in the studio because first of all we had no microphones in studio 2 not only that we also couldn’t get sound into the headphones so that the drummer could hear the guitars we only had an hour and half but not only that the main guitarist didn’t arrive for half an hour which delayed our recording time, after rushing around getting microphones and then finally managing to have sound in the headphones we fortunately managed to get a drum track done.
Week 3- During my breaks at college I decided to research into Heavy Rock vocals techniques so that when I get round to recording the vocals I am already familiar with what effects and plugins I am going to use on the Vocals them self.
Week 4- When we was in Studio 1 on the fourth week I felt that we would be able to produce a much better track because me and Michael were both familiar with this studio and how to use the equipment, we didn’t have any problems apart from when the overheads didn’t work but we solved this by recording the guitars, we decided that it was best we redo the drums so that the guitars and drums sound much better together, We only had 10 minutes left to try and record Vocals but fortunately we were able to do it and we both had a finished track we were both happy with.
Week 5- Again I wasn’t in the studio so I decided to start to mix and master my finished track using the techniques I found in my research.
Week 6 – The week of recording we encountered another problem unfortunately the main guitar fell sick on the day of starting the second track and the drummer was in but he needed a backing track of the guitars to actually create a drum track so we unfortunately wasn’t able to create our next song.
Week7- we were nearing the final stage of finishing our tracks off and I have researched all the things I think that are necessary for my tracks, So I decided that I would spend my time developing my proposal.
Week8- Our final and last recording session with Screaming Walls in Studio 2 we managed to in the whole hour and a half we managed to completely finish Council of the gods, as we managed to be able to use studio 2 now we had completely finished the tracks and I was happy with both of the tracks and I was now happy to mix and master it.
Week 9- Mixing the track but still developing my word press blog.
Week 10- Mastering the last tracking by adding final touches such as Reverb Delays etc.
Week 11 – Completely finished with mixing and mastering and is ready to upload to my word press blog
Choose 3 pieces of work that inspired you
Choice 1: the reason why this inspires me is because of how heavy the beat is and this inspires to me try and create tracks just like this and it creates me to have dedication to create these in the future.
Choice 2: the reason why this track inspires me is due to how old this song is and as it is one of the most popular drill songs, ever since I listened to it, it has inspired to me create and listen to drill songs. I also enjoy how punchy the drums are in all songs.
Choice 3: The reason why this inspires me is because not only is this a different genre to drill I like the
Make a comparison between yourself and those that have inspired your project
I feel like the reference track above sounds a lot more ambient, with elements of the reverb softening the track ready for the build-up. The drums is my project are louder than that of the reference track, which can be changed further into the mixing and mastering process. The use of panning in the reference track gives diversity throughout the stereo filed to keep elements of the track interesting.
What are the biggest challenges that you face in the way of your ambition for the project?
My biggest challenge throughout the project has been issues with the band members not turning up for sessions, this has created a great struggle in recording material towards the tracks and has made myself and members of the band communicate more so that parts of the track played by other members can be replicated or changed accordingly, for example: one of three guitarists had to play all parts and improvise new parts in order to complete the track.
As my brother was an ex colchester institute student and is now finishing at university in music technology I decided to ask him about what techniques and plugins he uses for mixing and mastering, as this is one of the areas I struggle with I thought that this would be good to ask it would be better for me to be familiar with this for creating tracks in the future.
When I spoke to him I asked:”Tell me what plugins and techniques you use for mixing and mastering”
He replied:” Ozone 8 and Neutron 2 because they have limiter EQs and compressors built in with loads of settings to change and manipulate and they all have the tools you need in side one plugin.”
How to record a band in the studio
in the link to the video it shows many different types of recording techniques
I learnt different types of recording techniques when watching the video I have different options which sound better in the mix like doubling up. Vocals guitar and drums will all have to be in separate rooms or they could potentially interfere with other mics during recording.
Screaming Walls songs are influenced by We were just kids – Emmure, Sick and Disgusting – Beartooth, Trauma Model – King810
When looking into those songs i realised that all of the songs had similarities to what they wanted there own tracks to sound like for different parts of there songs like We were just kids – Emmure sounded like there melodic sections Sick and Disgusting – bear tooth wanted to have there vocals similar, and Trauma Model – King810 that is how brutal that they wanted to have there track sounding

When looking into mixing and mastering It wasn’t something that I was particularly good at so I decided to research into compression to help me when mixing my finished band track As you can see in the compression there is 3 dials you can turn up compression ratios are expressed in decibels, so that a ratio of 2:1 indicates that a signal exceeding the threshold by 2 dB will be attenuated down to 1 dB above the threshold, or a signal exceeding the threshold by 8 dB will be reduced to 4 dB above it.The Threshold dial is how loud the signal has to be before compression is applied. The makeup gain refers to a gain control at the output of a compressor. Compressors reduce the level of the loudest signals, so after using compression usually the signal is quieter than the
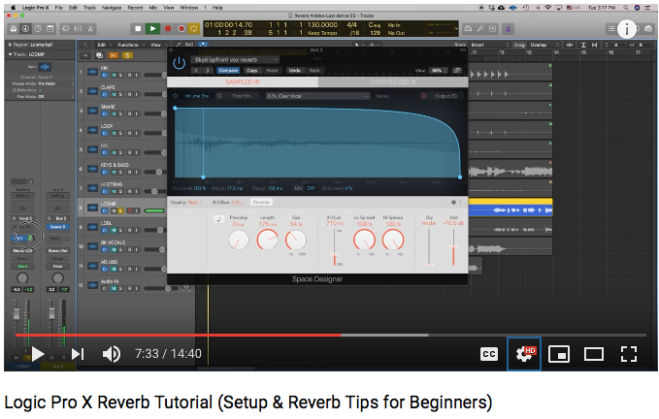
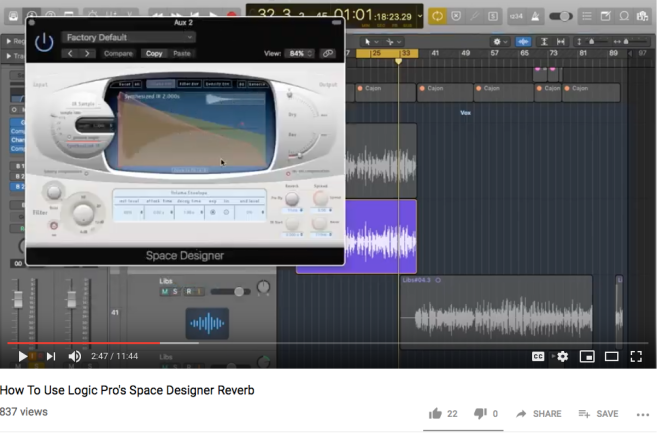
In this video it showed me how to effectively make my vocals and drums sound much better in the mix by adding 2 reverb plugins when using reverb I have the option to do 2 things I can either decide to use a preset or I can decide to customise it for my own personal liking, but also in the video it shows a different where you add 2 reverbs but rather than making it sound like your on the other side of the room the technique makes it sound as if the sound is being played in front of you but it is still in a medium space to give a more upfront sound which assures that it is upfront during the mix.
This a track from the beginning of the year it showed how much progression I have made and it secures what type of direction that I would like to progress in the near future I feel like it was good at the time but as of now I feel that this isn’t the genre and style of music that I would like produce but it shows how much progress I can make.
This video taught me how to properly mix the guitars to assure a much heavier and a sound that will fit better in the mix, it showed me how to make my guitars fit in the mix better by adding a delay plug into the guitar which makes the guitars fix perfectly in the mix,Finally was the EQ it made the guitars have more bass really fitted nicely, when I added EQ I made sure that it was similar to the video but the guitars would be more heavy due to the fact that my band are Heavy Metal and not Rock I made sure that that my low end was cut a little and my mid range boosted around 3dB to still give the heavier sound on my guitars.
5 examples of your concept that you love/admire.
One: In the track ‘pray for the day’ I like the attack of the drum recordings as it makes it fit into the genre effectively whilst standing out from other elements of the track.
Two:In the track ‘pray for the day’ I like the crunchy guitar tones throughout track, which I achieved using logic’s amp designer plugging, using the crunch tone preset to achieve this.
Three: in the track ‘council of the gods’ I like the arrangement of the track, how the guitars transit from a slower tempo into a faster tempo has the track progresses.
Four: In the track ‘pray for the day’ I think the quality the overall mix sounds clear & punchy, which helps fit into the genre the band are aiming their sound towards.
Five: In the track ‘pray for the day’ the kick sound punches through by the use of logic’s drum replacement protocol, which allows myself as the mixing engineer to manipulate the kick sound accordingly using the software instrument ‘EX24’ which is packed full of pre-recorded kick sounds.
5 examples of your concept that you dislike/wish to avoid.
One:In the track ‘pray for the day’ I dislike the sound of the vocal takes, this is due to the fact of the vocalist sounds like he’s struggling with his ‘scream’ technique and this is apparent throughout the track.
Two: This particular genre of music is not something from a consumer basis that I would normally listen to, this project has brought me out of my comfort zone and I’m not sure that I would take on another project within this genre of music.
Three: In the track ‘pray for the day’ I feel like there could’ve been variation in the drum & guitar tracks, however the material recorded matches that of the genre so it was not changed in nor the recording or arrangement process.
Four: In the track ‘Council of the gods’ I don’t feel like the parts of the track were the vocalist is screaming suits the arrangement (32 seconds in) as the instrumentation is quiet and screaming drowns out the rest of the instrumentation, I feel like he should’ve tried some light singing to match the instrumentation and then scream in heavier parts of the track.
Five: In the track ‘Council of the gods’ I feel like the lyrics in the track are repetitive and have no immediate indication of a chorus or verse as they repeat themselves so much, to improve the track I would recommend that the vocalist changes some of the lyrics and then we should re-record this to improve the track in my opinion.
Make a conclusion about this research in relation to you.
In my conclusion, I have discovered genre specific plugin chains in order to help me with the mixing and mastering processes in the project, as I have never completed a recording or mixing & mastering session in this particular genre. If I were to complete the task a second time round a would have a more in-depth knowledge of communicating, processing & recording skills in order to complete the task to even higher skill level.
Task 1
Section 1
Q1: How much progress have you made since September 2018?
Since I have started college at September 2018:
I feel that I have been able to create better tracks and also been able to mix and master them as I now know how to use the compressor plugin to help me keep my decibel on logic down to -4dB and so that this helps in mixing so that my track doesn’t clip.
Q2: Specifically what have you learned during units 1 to 7?
Unit 1 & 2 helped me familiarise my self with how to make a proper track in logic by showing me differences in musicality which shows me the differences and structures of how the track should be actually made.
Unit 3 Helped me to see what it is like to create your own music business and what steps you need to take to do so, for example:
Unit 4 Helped me to be able to properly set up instruments in a live sound setting in the Swinburne hall also I learned how to properly get output to the main monitors in the hall by using the sound desk
Unit 5 Made me be able to properly use the studio by helping me learn certain mic techniques for overheads and guitars, also it helped me learn what microphones to use I also learned how to use the sound desk for the studio and now I can send guitars or drums to to the head phone bay so when I am recording guitar and the musician wants to have drums in their headphones I can do so.
Unit 6 helped me be able to mix and master tracks correctly it helped me familiarise my self with the compression plugin in logic the plugin in helps because it helps your track not clip and can help make vocals sit better in the mix.
Unit 7 taught me how to properly create a remix track but also I felt that it helped me understand chords better and helped me understand how to create drops on my own tracks
Q3: What does this learning mean to/for you?
This learning has helped me to understand things that I didn’t know or wasn’t familiar with but this also has helped me to become a better producer and I feel like that I have made a lot of progress and I have learnt a lot of techniques since when I first started to become a producer.
Q4: How has your learning/experiences during units 1 to 7 influenced your choices for unit 8?
learning from unit 1 to 7 it helped me influence during recording my band for unit 8, when I was in the studio I decided to use the X and Y Technique for my drum overheads and I also miced the top tom and bottom tom because of the type of band I am recording ,when recording guitar amps I used the technique double up where I placed a microphone on the front of the amp and at the back so that during the mix it sounds a lot fuller and can be heard better in the mix.
Section 2
Q5: What is the concept behind your project?
The concept behind the project is to record in a group of two, a three track ‘Screamo’ EP within a ten week period. The band is called ‘Screaming Walls’ they consist of three guitarist, vocalist, bassist & a drummer.
I am then as an individual set the task of mixing and mastering the three track EP using chosen techniques that I have learnt from units 1-7 whilst having influences from the research task about the ‘Screamo’ Genre and ideas given to me by the band of how they want themselves to sound. Slipknot is a key influence of the band as they have followed similar stage appearance through the use of Halloween style masks.
After the mix and master stages are complete I am giving the option to create an original composition or chose to be the live sound engineer for ‘Screaming Walls’ upcoming gig that will take place within the ‘Swinburne Hall’ I have chosen to create an original compisition as I would like to follow the career path of a multi-media composer as this is something that has interested me for some time now. Once the composition is complete it will be uploaded to all streaming services to expand my potential listener base.
Q6: What are the sources that inspired it and will support you developing it?
I have researched into bands of the same genre in order to get a rough idea of how the tracks should sound. These are the following bands I have researched into in order to understand the genre and its processes more:
Based on this research I have discovered that the instrumentation relies heavily on the guitar and drum recordings to push the track, however the vocal track is always slightly higher in the mix around these recordings and requires low frequency cutting in order to push it above the rhythmic section.
Drums: Drums will need to be heavily compressed to match the snap of the chosen influence track’s drum sonic characteristics.
Guitar: Guitars will need distorted tones in order to match the genre, for example a plugin alternative for this sound would be the ‘amp designer’ in Logic using the ‘Razor Rock’ preset which matches the desired tone of the influence track.
Vocals: Vocals consist of a clone tone, however they benefit from a small amount of bussed distortion to have more control over the harmonics of the recording and finish off the mixing process with a small amount of reverb to reduce the harshness of this sound.
Q7: What resources do you need to carry out this concept within the timescale ?
The resources I will need to complete this project within the timescale include:
Section 3
Q8: How will you record your evaluation through out the project?
I am going to record my evaluation during my project by using WordPress but to do this I am going to create a weekly diary of what I will be creating during the weeks of recording.
Q9: How are you going to record decisions that are made during the project?
I will be documenting my decisions by using a weekly diary and also once I have create it I will then be evaluating and reflecting on my own progress that I have made for each weeks. for the diary I also will be providing screenshots to go along with the diary.
Task 1

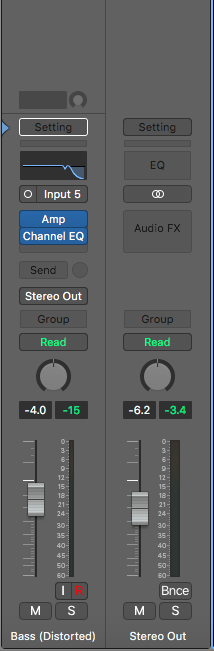
Here you can see that this is the overhead left as you can see that the pan level is to the left the reason why I done this because the overhead is on the left hand side so I panned it half to the left.Also you can see that the volume has been decreased to -4.0dB the reason why I done this is because I needed the main output at least at -4.0dB or I cannot mix and master it because the tracks will clip.
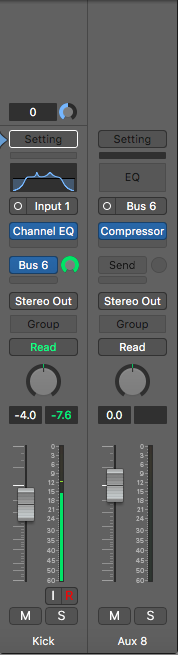
Here you can see that the kick drum has a send effect you can add a send effect by adding a send bus effect as you can see on the bus there is a compressor also the bus fader has been turned full so that I can hear the kick mainly in the mix.
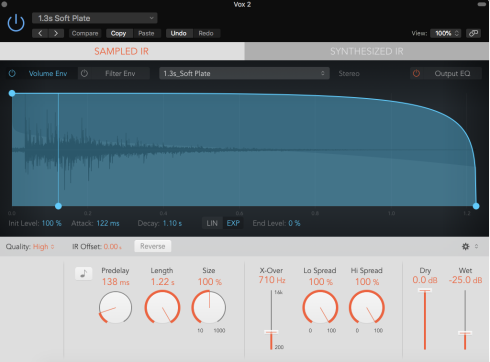
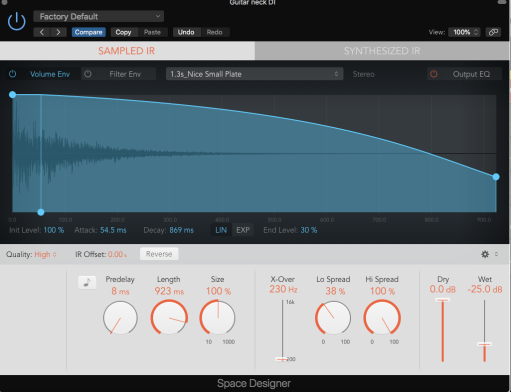
This the reverb effect on the vocals as you can see the wet signal is at -25dB if you turn the wet signal up more it will have a more echoey sound but if you turn the dry up it effect the raw sound.
When mastering the track you can use a preset to use a preset go to the stereo out then press settings after then pressing settings go to factory then choose from a preset.
But if you were to do it manually you need to turn the levels of your track down do where the stereo output sound is at about -4.0 the reason why is because if you goes past -4.0 then the track will clip but as you can see I have mastered the track successfully because the stereo output is at -4.7.
Task2
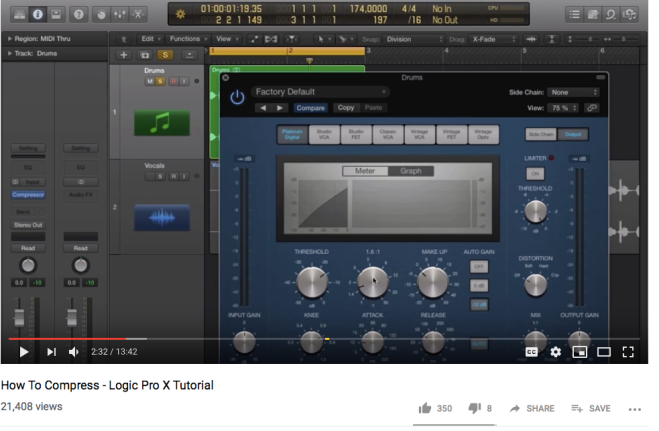
After watching this video it helped me familiarise myself with the threshold and make up gain, the threshold is when the compressor actually starts to work and the makeup gain is lowering the sound on the stereo out put but making the sound actually louder, the reason why I would use this during mixing and mastering is to keep the stereo output from clipping.
This video showed me how to use the wet and dry gains properly the wet signal is the effect and the dry signal is the raw sound, the reason why I would use this in mixing and mastering is for the vocals this would help my vocals be brought into the mix better.
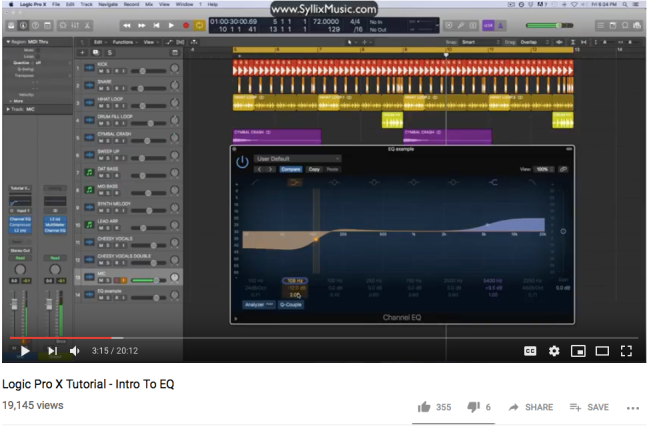
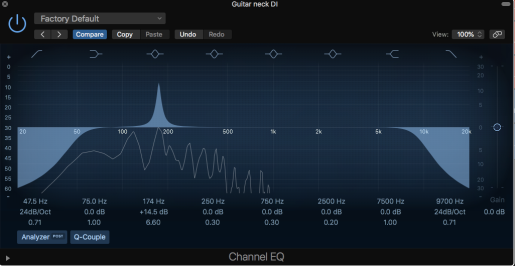
This video helped me use EQ properly first and last tab on the EQ is called the Low Pass and Hi pass filter the low pass filter lowers the sound and allows the lower frequencies to pass through where as in the hi pass filter it allows higher frequencies to pass through, the other tabs help boost or cut the frequency Boosting helps create a gentle natural sound, where as in cutting it lowers the sound.I would use this in mixing and mastering because I would use this for my kick drums to cut the lower frequencies.
Task3
Track1

When first mixing and mastering the track Meatloaf I decided to use to track stack and I also changed the colour I used the technique on the drum kit and Guitar the reason I did this is because it makes sure that I know which instruments are which also track stacking helps when I am applying effects using the bus.

Applied to all the tracks you can see that there is Bus 6 if I apply an effect to the buss then turn the fader on bus 6 up it increases the effect.
After then applying effects to the drums I then decided to apply effects and EQ the Bass as you can see the eq I applied I decided to cut the higher end to make sure that it increases the bass on the frequency
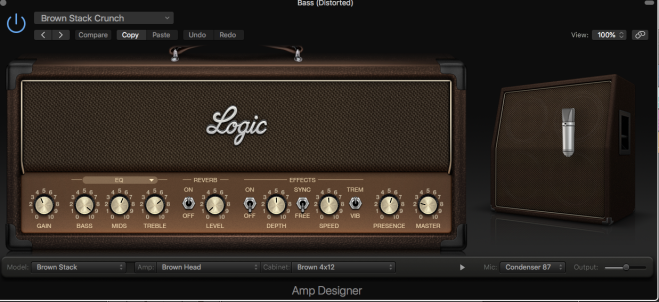
Here is the plugin amp as the bass player wanted a trebly sound the treble is increased also the bass is full to give a punchy bass sound.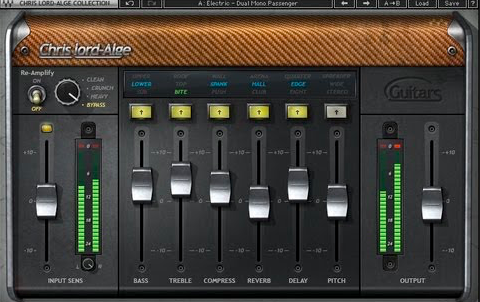

Unfortunatley as I do not have the CLA Guitars I couldn’t use this plugin but as I used the plugin while mixing at college the reason why i decided to use it is because it has a compressor in the plugin already and it also gives the guitar a clean sound.
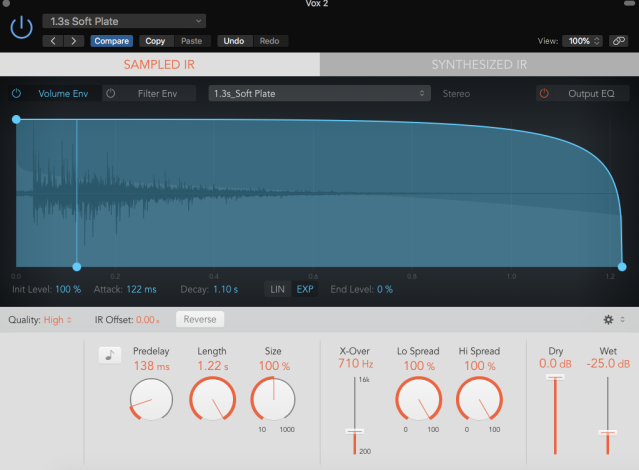
When mixing the vocals I decide to add some reverb i used a plate reverb because it changes the tone of vocals and makes them sound much brighter in the mix.
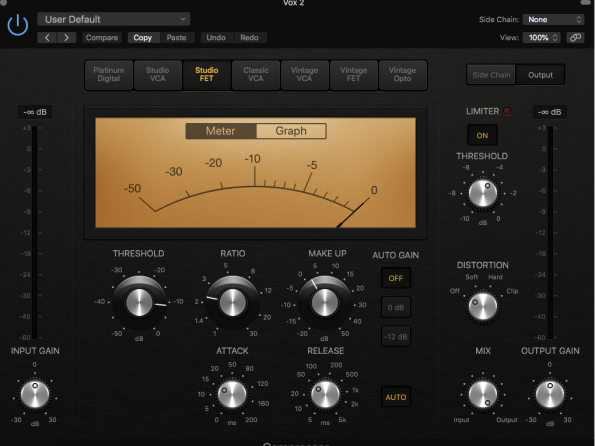
After then adding reverb I needed to compress the vocals I decided that the threshold needed to be around the -10 on the threshold because this is how loud I wanted it to be before the compressor started to work, and I had the makeup gain on 2dB so that it would lower the actual stereo output volume but would make it louder.
Track 2

In this screenshot this shows the first effects I applied on the guitar when I was mixing and mastering the track.
In this screenshot it shows the EQ on the guitar I decided to boost the mid range to brighten the guitar to sit in the mix better.
Here is the reverb I applied on the guitar I decide to have a little reverb so that the guitar sits in the mix better and it makes it echo so it can be heard much better.
In this screenshot it shows the EQ of the vocals as you can see the Low end has been cut due to the unwanted lower frequencies of the singers voice and the hi end has been cut to give more bass in the vocals.
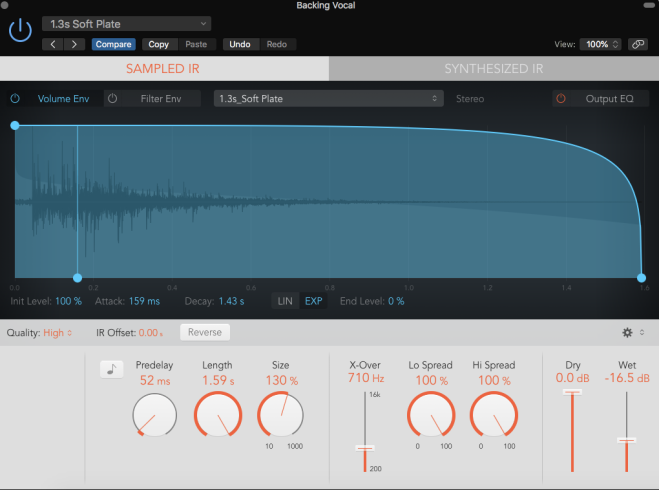
for the backing vocals I used the same EQ for the main vocals to boost bass in the vocals but for reverb I decided to drench it in reverb so in the mix its sitting perfectly and sounds great.
Task4
Here in this screenshot it shows that I have applied a bus to the kick when also on the bus I have applied a compressor when I turn the bus up it turns up the effect.
In this screenshot it shows the bass as you can see the Hi end of the EQ has been cut to boost the bass.
Here is the amp plugin on the bass as you can see the Bass is max and the treble is high the bass player wanted a crunchy sound so this is why the mids are high also with the bass and treble
.
In the guitar plugins I had used the CLA Guitars in college but as I don’t have access to this plugin at home I wasn’t able to use it but when I did have access to it I used it due the cleaner sound and the compressor that is already in the plugin, this helps me because I don’t have to use a compressor on the guitar.
In this photo is the reverb on the vocals I used a plate reverb because it sounds much brighter in the mix and changes the tone on the vocals.
After then adding reverb I needed to compress the vocals I decided that the threshold needed to be around the -10 on the threshold because this is how loud I wanted it to be before the compressor started to work, and I had the makeup gain high so it would increase the volume of the vocals and sit better in the mix.
Track 2
In this screenshot this shows the plugins on the guitar for the second band.
This shows the EQ on the guitar I decided to boost the mid range to make the guitar sit better in the mix and brighten the guitar.
I decided to add some reverb on the guitar so that it echoes and can be heard much better in the mix
.
This shows the EQ on the vocals the low end has been cut due to unwanted low end frequencies but in the hi end it has been cut to boost the bass in the vocals.
For the backing vocals I used the same EQ for the main vocals but I decided to drench the backing vocals in reverb so that it echoes out and fits in the mix better.
Here is the first bands song Meatloaf after being mixed and mastered:
Here is the second acoustic bands song after being mixed and master:
Task5
I think that the mix and mastering was successful but even though where I didn’t have the correct plugin CLA Guitars for the guitar in the acoustic track I still managed to produce the second track but just using a different amp but even though I did encounter a problem with one of the tracks where half way through there was a glitch which occurred during recording even though there was nothing that we could do we just had to ignore the glitch as we couldn’t do anymore recording we had to just carry on.
If I could go back a change one thing that I would do to the mix and mastering it would be the kick drum I should of used the double up technique this would of made the kick drum more punchy and bring all the instruments together in the mix, also I felt in the first track that the bass was not coming through the mix how I could of fixed it is I should of boosted the levels of the EQ.
in the second track I felt that the backing vocals and vocals sat great with the reverb in the mix also if I were to add more effects I would add more reverb to the singers vocals because the singers vocals are quite flat for a singer I would add some more wet signals to the reverb so that the vocals have a echo to them I feel like if it were to have a echo it would help bring the mix together.
Task 1 -What mics will be used
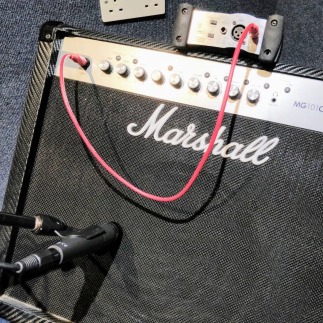
We decided to use the sm57 and also plugged a DI box to the amp on the amp because it gives the better sound and stronger signals , and also the sm57 is particularly sensitive to the mid range sound better then any other mic, also we decided to use it on the snare drum.
Here you can see the drum kit we decided the audix D6 mic because it would give a better undistorted sound and it also has low mass so that it picks up more rapid and cleaner sounds.
For the vocals we used the RODE NT1-A because it has the largest frequency response to any other vocal mics.
For the acoustic guitar mic we used 2 C 1000 S because we felt if we had 2 it would boost the mid frequency and give a better sound.
These are all the mics that we recorded with during the recording of 2 bands.
Task 2 What techniques will be used

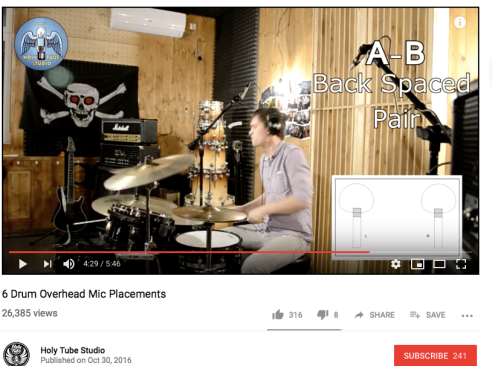
We used the Overhead technique A-B Back spaced pair because it helps bring the hats, snares and toms into the mix much better.

Here is the technique doubling up during recording guitars it helps the guitars pick up a better mid range sound.
Task 3-Diary
December 4th – we first started recording the song “meatloaf” we mic’d up the drum kit here you can see in the video that we used the same overhead technique this technique helps brings the drums together to give it a more full and punchy sounds on the hats ,toms and snare.
December 11th
After then recording the drum beat we need to record bass here in the photo you can see that we are using the condenser mic DM12 the reason why is because it picks up the lower frequency much better then other mics like the sm57 and also we decided to put the mic on the right hand side because that is where it would pick up the boomier and better sound.
Here is the photo where we also mic’d the guitar amp for the first band we recorded as you can see we used the SM57 condenser we decided to also put the microphone close up to the left side of the pre amp the SM57 is particually sensitive to the mid range sound.
Second band
February 5th
Here is the second band that we recorded using NT1-A Vocal mic the reason we used this mic is because it has the largest frequency response of any of the vocal mics, Also we used this large pop shield so that the vocal mic does not pick up poppy sounds when the recording vocals.

Here you can see me setting up the mic C 1000 S for the acoustic guitar for acoustic band we recorded we decided to use two of the mics so that it gave us a better sound and better mid range for the guitar but we encountered phase so we decided to use the gain plug in and flipped phase.
Task 4 Video evidence of participating in studio

To see the video of me participating in the studio click this link this video shows me preparing the levels of.
Task 5 Analyse the studio sessions
As a whole I think the the recording sessions that we participated in where successful due to the fact ever since we have started being in the recording sessions we were taught crucial techniques like The A-B Back spaced pair which helped cover the drum kit much better but also even if we came across problems during recording like having no sound or having no feed back we only had to do problem solving which would be making sure the sound is on stereo output.
But other times there where problems we couldn’t solve like when we was recording the band as we were trying to change the talk back system in booth 2 to make it louder and as we were trying to turn the gains up the talk back just wasn’t coming through.
but also we encountered a problem with the reverb on the talk back on booth 2 once again but all we had to do was change the send effect and turn it off then the talk back system had sound with out an effect.
Sound Engineer- Qualifications
The minimum qualification for sound engineers is a secondary school diploma or a equivalent for entry level positions , however for dealing with more complex equipment many employers prefer workers with some post secondary train which is available from college manufacturers may have formal training programs or may even enroll workers in apprenticeships, with enough experience sound engineers can work on audio projects by themselves and eventually could even train new workers.
Potential Earnings
A sound engineers salary can differ due to the different location where the engineer is actually based but mostly there salary is 26,124 year and can even increase or decrease from that.
Example of a Sound/Audio engineer
Jean Umansky is a French sound engineer; he was nominated for an Academy Award in the category Best Sound for the film Amelie,he has worked on over 50 films.
Organisation associated with Sound Engineers
AES(Audio Engineering Society)
The AES Brings all audio engineers and people who have careers in music together and can help others get a career in the music industry, most people join the AES to further there career and help others.
The AES website has lots of forums about many things to do with sounds and magnetic pick ups for certain guitars, for many sound engineers this could be helpful if they feel like they need to know this information.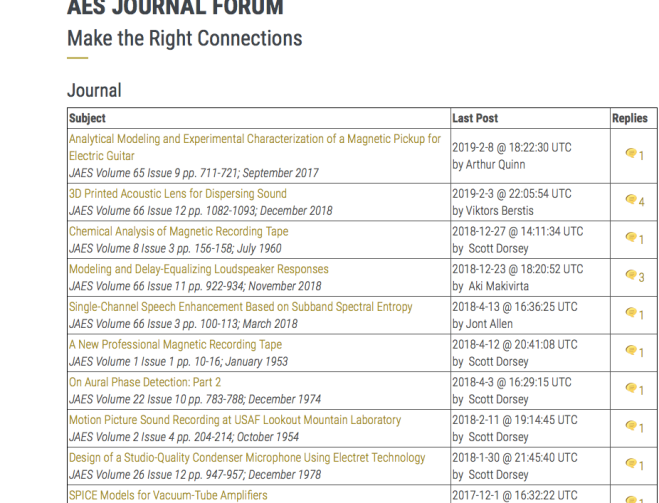
Method of application
The application would not be a typical hand in a cv and have an interview it would most likely be a face to face, and they would most likely have a live sound setting and ask you to set up a small venue to see if your skills are good enough.
Career potential assessment
This career would be the best money earner as when you progress in sound engineering the amount of money you earn will increase as some sound engineers do the live sound for festivals like wireless.
Music Producer-Qualifications
The best part about being a music producer is that you do not need any qualifications, but the only thing you would need as an artist is the skills of knowing how to actually produce the songs.
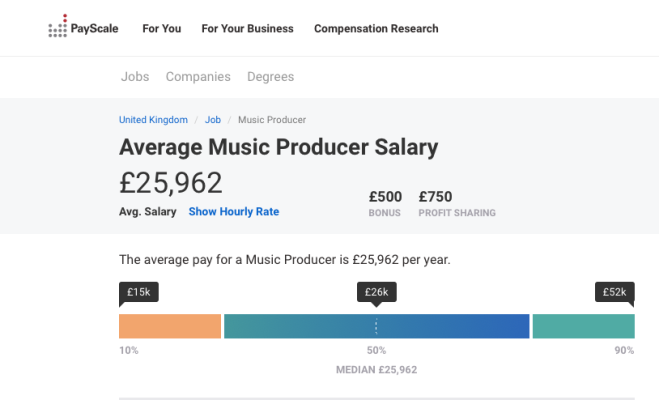
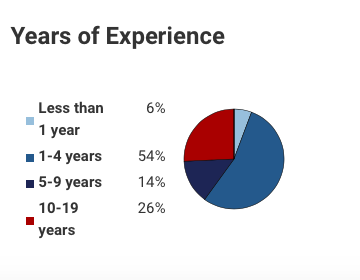
Potential earnings
From the website PayScale the average a music producer can earn is £25,962 But this could differ from. But if you look at the pie chart this earning can differ from experience.
Example of a producer
Dr.Dre is one of the many famous producers he started his own record label Aftermath Entertainment and he even went on to create his own headphones company Beats by Dre.
Organisation associated with Producers
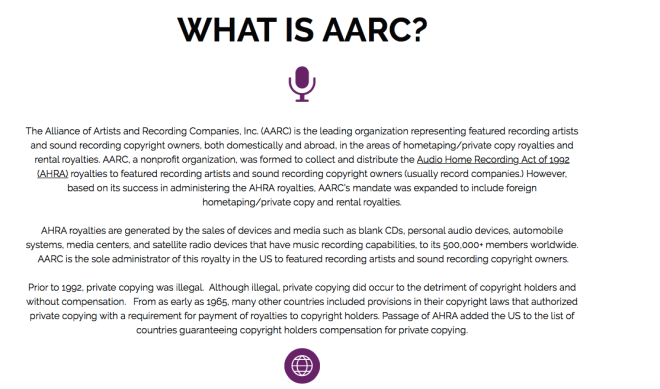
The Alliance of Artists and recording companies which started in 1992 it is a private copy royalty company, the AARC represent record artists, and sound recording copyright owners the association was so successful they expanded to include foreign home taping and private copy and rental , this is based off the AARC website.
Method of application
There is no actual application for a music producer as most music producers do it for them selfs as it is can be so easy to do because you can use your own equipment to produce the music.
Career potential Assessment
This career is one of the most successful as you can produce your own remixes or own tracks and can produce what ever you would like to create but the money side of things is depending on how much you produce music, but if you were to create your own table like Dr Dre and this is what you want then this career is something for you to look at.
Music Artist- Qualifications
Depending on if you would like the qualification, you dont need the qualification but most Music Artist start with the qualification and start sining or using instruments at a young age; The qualification starts at BTEC level 2 and goes all the way to Foundation Degrees but this can most likely turn into a degree.
Potential Earnings
Most artists cannot make a living from singing as most people do gigs and can earn £50 from a pub gig but a backing vocalist could earn £500 but £1200 for someone more established and for signed artists money is negotiated between the record company and the artist; but in London the fees are varied.
Example of a artist
Professor Green is a music artist and he first started his musical career in 2006 when he realised his first mixtape and he was signed by the record label ‘The Beats’,After then going on tour once he returned he was then signed by virgin records in July 2010.
Organisation associated with a music artist
European Composer and Songwriter Alliance The main objective of the ESCA is to defend and promote the rights of the authors music at the national European and international level by any means.The ECSA also strives to improve social and economic development of music creation in Europe.

Method of application
The method to applying for the job role Music Artist would most likely end up you trying to become part of a band and doing gigs then once you have built up and created your following then choosing to apply for festivals and other large venues.
Career potential Assessment
For a career this would not be viable because of the money the artist earns but if they are wiling to put the effort in and create there band from the ground up then this career will be for you.
Task 2 – Risk Assessment
For a sound engineer the main risks are Objects falling moving or flying, Slips trips and falls also Electric shocks and noise levels.
The way to control the objects falling is to ensure no equipment is at a raised level is balancing and any cables or microphones which are attached to stands are properly secured.
Slips trips and falls can be controlled by making sure that cables aren’t in the way and don’t cause trip hazards all cables are grouped and positioned away and far away from where people are standing along walls where possible and all equipment will not be left in positions that people can fall over them.
The risk of electric shocks can be stopped by making sure that the electric appliances have up to date PAT test label.
Overly loud noise can be controlled by the sound crew but they should follow normal regulations and not boost audio levels to extreme levels.
For a sound engineer the main risks are wire tripping hazards, Electrical shocks on equipment food and drink in the studio.
To stop wire tripping hazards in the studio you need to make sure that the wires are not in the way of recording musicians you can do this by taping the wires doing into the floor of the recording booth so that there are no risks of tripping.
With electric shocks to ensure they don’t happen regular checks on wires need to be put on the wires to check if the wires do not go short and also to ensure PAT is up to date on the electrical equipment like the DAW.
Another hazard is food and drink inside the studio this can be a problem because if drinks are spilled on the electrical equipment it would be damaged and this would cause financial problems for the studio, also if you are eating food inside the studio it could also damage the equipment if crumbs get inside of it, this can be stopped by banning all food or drinks inside the studio.
Task 3 -Music Business Plan
Aim of the business
To have a Successfully running studio and recording bands at a cheap price with the best quality service with the Brand name ‘Plug Media’.
Online promotion
I Created SoundCloud first of all to post the tracks that are going to be posted when I make them, then a made a facebook group to post pictures of me inside of the studio
Income and outgoings
First of all I need to take out a loan for £50,000 to make sure I have all the microphones and speakers and the main studio sound desk which is to also ensure I have all the sound proof walls and carpeted flooring. so to start with I will be in -£50,000 debt to ensure my studio is fully started up, with the money I had left over I started to pay famous artists to advertise my studio across the internet and social media, once I had paying customers I started to earn £5,000 a month within the first 2 years. with which I started to pay £4,000 a month to Pay off the debt
USP(Unique Selling Point)
The USP My company has is its low price and high quality and perfect for any band genre that needs the perfect audio for there songs.
PEST Analysis
Politcal- If the tax were to be increased then it would be more expensive for bands to use my studio and it couldn’t potentially mean my customers cannot afford the fee for the studio.
Economic – Inflation would effect my business because the money rate would highly increase and would mean that I would have to increase the charge for the studio hiring prices, also if there a lot of studios already in the area this would increase competition
Social – Depending on where I actually place my studio it could potentially mean that I have it in an area where there isn’t much bands or artists in the area this could effect the earning potential of my business.
Technological- If technology was to become a lot better and more complex this would effect my earning potential and how much profit I earn because of technology prices of the studio sound desk and other things like microphones and speakers would potentially increase in price because of the improvement of technology.
SWOT Analysis
The strengths of my business would be the low price and high quality of the actual products that I produce.
Where as the weakness is where the location of the studio actually is and how far other artists are.
Opportunities – when the business is earning a lot more money I could be able to branch out other studios to make my profit margin increase.
Threats – The threats of having the studio is that it takes a lot of money and time to create it and the competition of the other studios in the area
5 Year Plan
For the first year I hope to have all the studio set up and make sure everything is ready to be used and make sure all my equipment has been checked over and has had all electrical tests to insure that none of it will break during recordings.
For the second year I will make sure that all my social medias are ready to be put into use and I am starting to post pictures of me using the actual studio and that I have built up my following of ‘plug media’ but by the end of the year the £50,000 debt has been payed off.
In the third year I am hoping to make arround £80,000 then I am going to redeposit it into the business so I have better equipment and then my sound quality will be much better for the lower price of hiring.
In the fourth year my aim is to create at least 10 tracks in the top ten charts and to have all my social media accounts flowing with pictures of me creating the chart songs.
In the final and fifth year I am looking to make over £100,000 and to have more than at least 2 top chart singles and at this point my social medias have all my popular songs and on the weekly I have posts of me creating and mastering the songs.
Task1- How can remixes can help your music career
The music scene can be hard to get into for producers who are unknown and do not have contacts to have there music listened by other people , Remixes can help you practise building up your skill to make you a better producer these skills can consist of Mixing and mastering, practising different styles of music so you could make your own track when you have a viewing-eg House or trap.
If you are remixing a famous artists you can use there fame for when people are searching for their song on the internet, and your remix will pop up before theres and if your remix is good enough then people will potentially check out your other creations and you will have more followers, if you remix the song into another genre this could help gain you more fans who are into other genres like your music.
Task2-Diary
Diary
I felt like I needed time to plan what song and type of music I want to choose to remix the song so decided to start later on and finally chose what track I wanted to use; at first I decided to use Coldplay then realized I wanted to use the track Summer time sadness because I felt the tempo of the song was and as I am not very good at chords this was the one for me to choose.
11th December : First of all I found out what chord I needed to play which was the E Flat chord I used the plugin called Tuner on the piano loop that was on the logic file with summer time sadness to find out what what chords are being played, After doing all of this I decided to strip the track down to just the summer time sadness Vocals.
17th December : then I had to decide what instrument I chose the synth Analog poly synth because of the sound it gave I felt that it fit with the lyrics of summer time sadness I chose the genre EDM because of the tempo which is 112 bpm this is what the chords looked like after adding it to logic it also gave a analog sound to the track rather then a digital EDM track.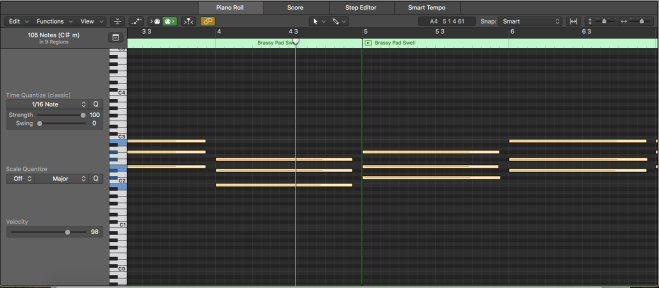
7th January: I decided the chords went well with the hi-hat analog circuits this is what the piano roll of my hi-hat look like the hats helped the track form a build up.
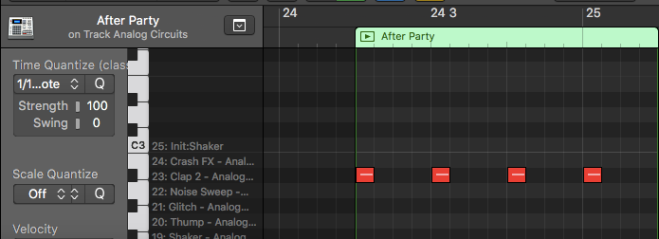
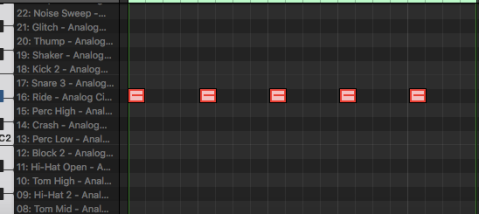
8th January: After adding the hats which fit great with the track I added a clap to form the track when the build up is happening.
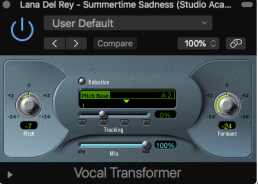
14th January: Once my build up was made I started to create my drop I used Deep Techno FM Bass because of the pluck sound; it branched my track out into house which is slow but as the lyrics of summer time sadness are faster than my drop I had to use a plugin on the lyrics called “Vocal Transformer”
Vocal transformer helped me slow down the vocals and made them sound deeper this made my track house as you can see the dial format is changed to -24 which has made the vocals sound darker.As I used this this helped me learn how to use this plugin correctly and now I can make vocals darker or lighter.
To create a contrast to the drop I used another synth called digi cream this gave a different plucky repetitive sound because of the reverb that is on the sound.when the drop came in I used automation to slowly cancel the other sounds out, While I slowly brought the drop in the reason why I didn’t add reverb to the sounds is because of the synths I have chosen which already have effects and reverb on them.

Task 3 – Create MP3 of remix
Task 4 – How I created the remix
Before I could make the remix the track started with the vocals and the piano chords I decided to strip it down to just the vocals after this I then started my track with the chords I had to use the plugin tuner to find out what chords were being played and it was the E Flat chord. I used the synth Analog poly synth because I thought it went well with the vocals. I felt in the mix the chords sat great because of the synth sound with the vocals.
After then choosing my chords I then decided I needed some hi hats to start a build up it helped form the track at the beginning. in the mix the hats sat perfectly because of the tinny sound sitting together with the synth and vocals
After then bringing the hi hats in I then cut them off and added in a clap because I felt on the drop it would sound much better and would go with kicks when I add them in. In the mix I felt that the claps sat perfect because it mixed great with the drop and the build up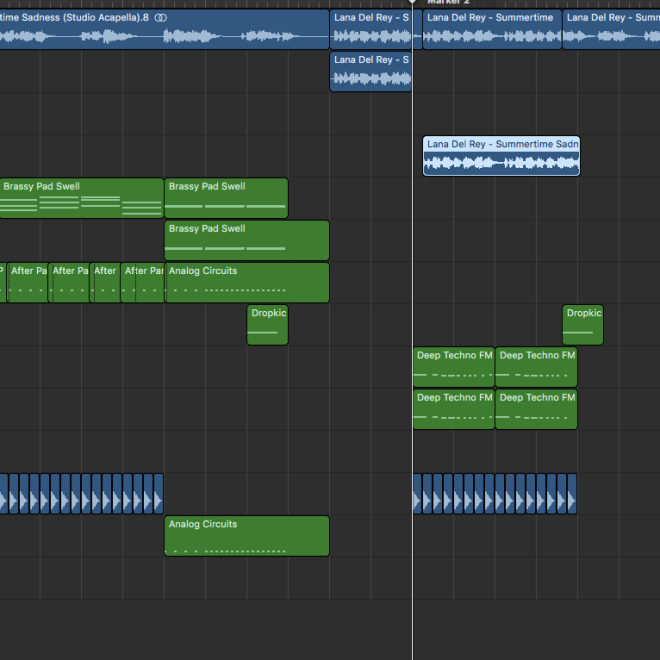
As you can see the analog circuits is the claps and you can see that on the midi track that I added multiple claps to help with the build up. The two deep techno FM Bass are my drops and I felt that they should of been placed there because of the fade out which is dropkick I then changed the deepness of the vocals using the plugin Vocal TRF this helped the drop become in time with the vocals of summer time sadness. I added in kicks because I felt that it went well with the drop and it helped the lower frequencies come through the track and it helped bring the mix of the drop together.
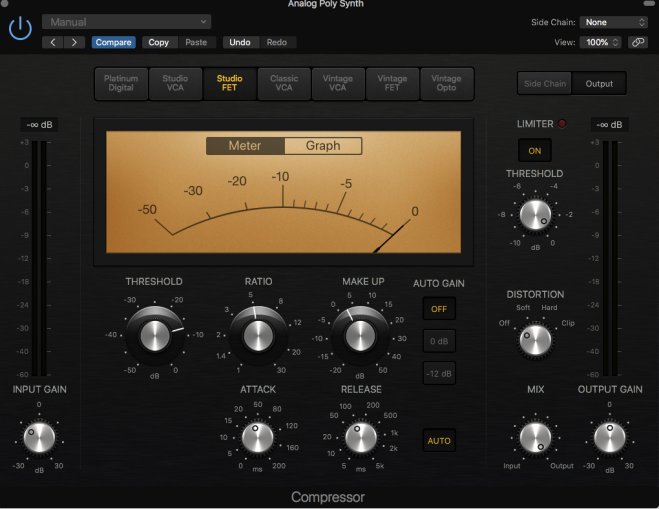
When Mastering my track I had to use the plugin Compressor what compressor does is boosting the quieter sounds while reducing the louder sound, I am now a lot more familiar with the compression plugin as I had practise when mastering my remix, this helped me familiarise my self with the buttons on the plugin, threshold is how loud the sound is before the compressor is applied and make up gain helps make the sound louder in the mix.
Evaluation
I think the track was a success and I’m really pleased with it and I feel that I have progressed so much from where I started from when I first started, but if I were to go back on my track and change things I would put a part in my track where it contrasts everything and this part would be completely different to everything else in the track
I feel that this would of made the track better then it is now because it would add different sounds into the mix and it would make things in the track unpredictable
